Create Customer Company
In this example, we will demonstrate how to create a customer company using a workflow. Since the process involves several entities and entity components, the workflow will consist of multiple steps and operate within a single transaction. We will also create a simple custom page where the user can enter the company details and initiate the workflow.
Entities and Components
Section titled “Entities and Components”Entities and entity components involved:
- Party (entity)
- Company Info (component)
- Party eMails (component)
- Party Phones (component)
- Customer (entity)
Workflow
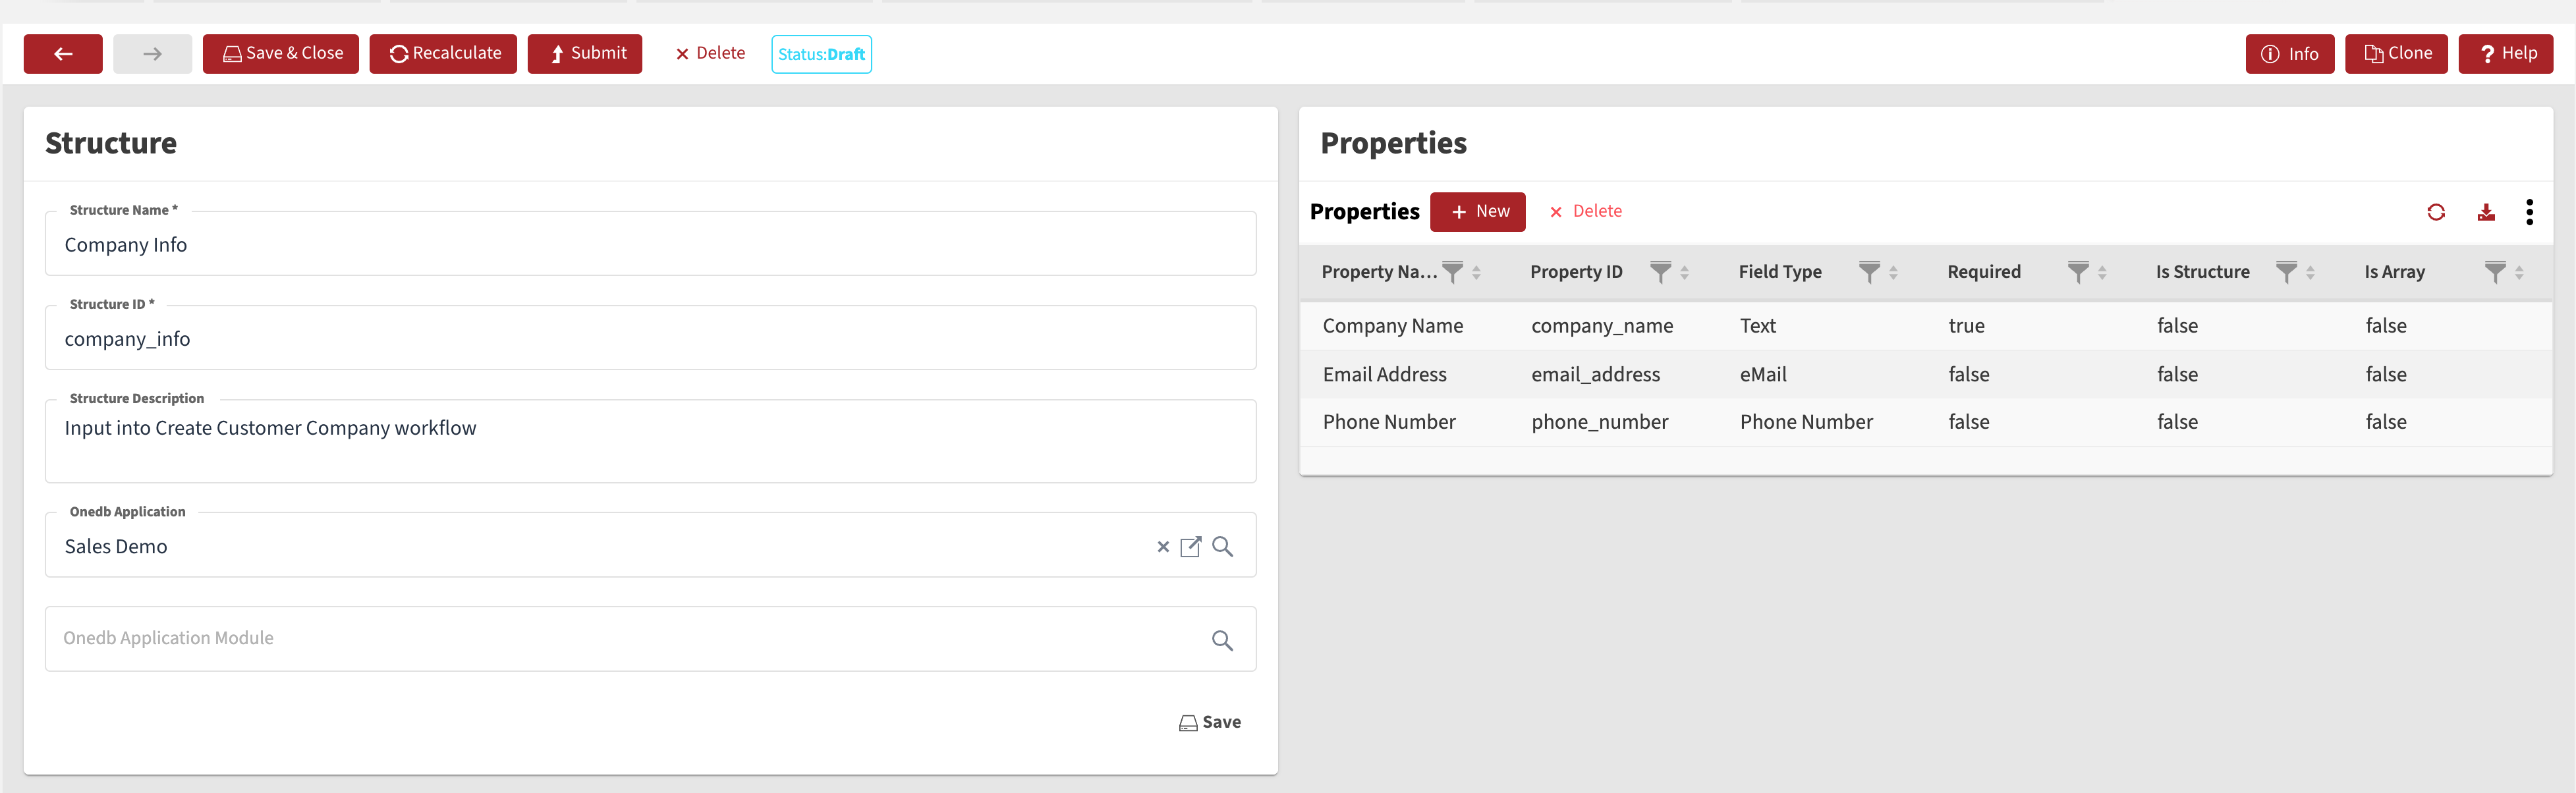
Section titled “Workflow”The company information will be provided as input to the workflow. Since there is no predefined structure in the system that contains the specific details we need from the user, we will create a custom structure. To do this, navigate to Home Screen -> Data Definition Layer -> Structure. As shown below, the structure is named Company Info (or any preferred name) and includes the following three properties:
- Company Name (Text, database type is text)
- Email Address (eMail, database type is text)
- Phone Number (Phone Number, database type is text)
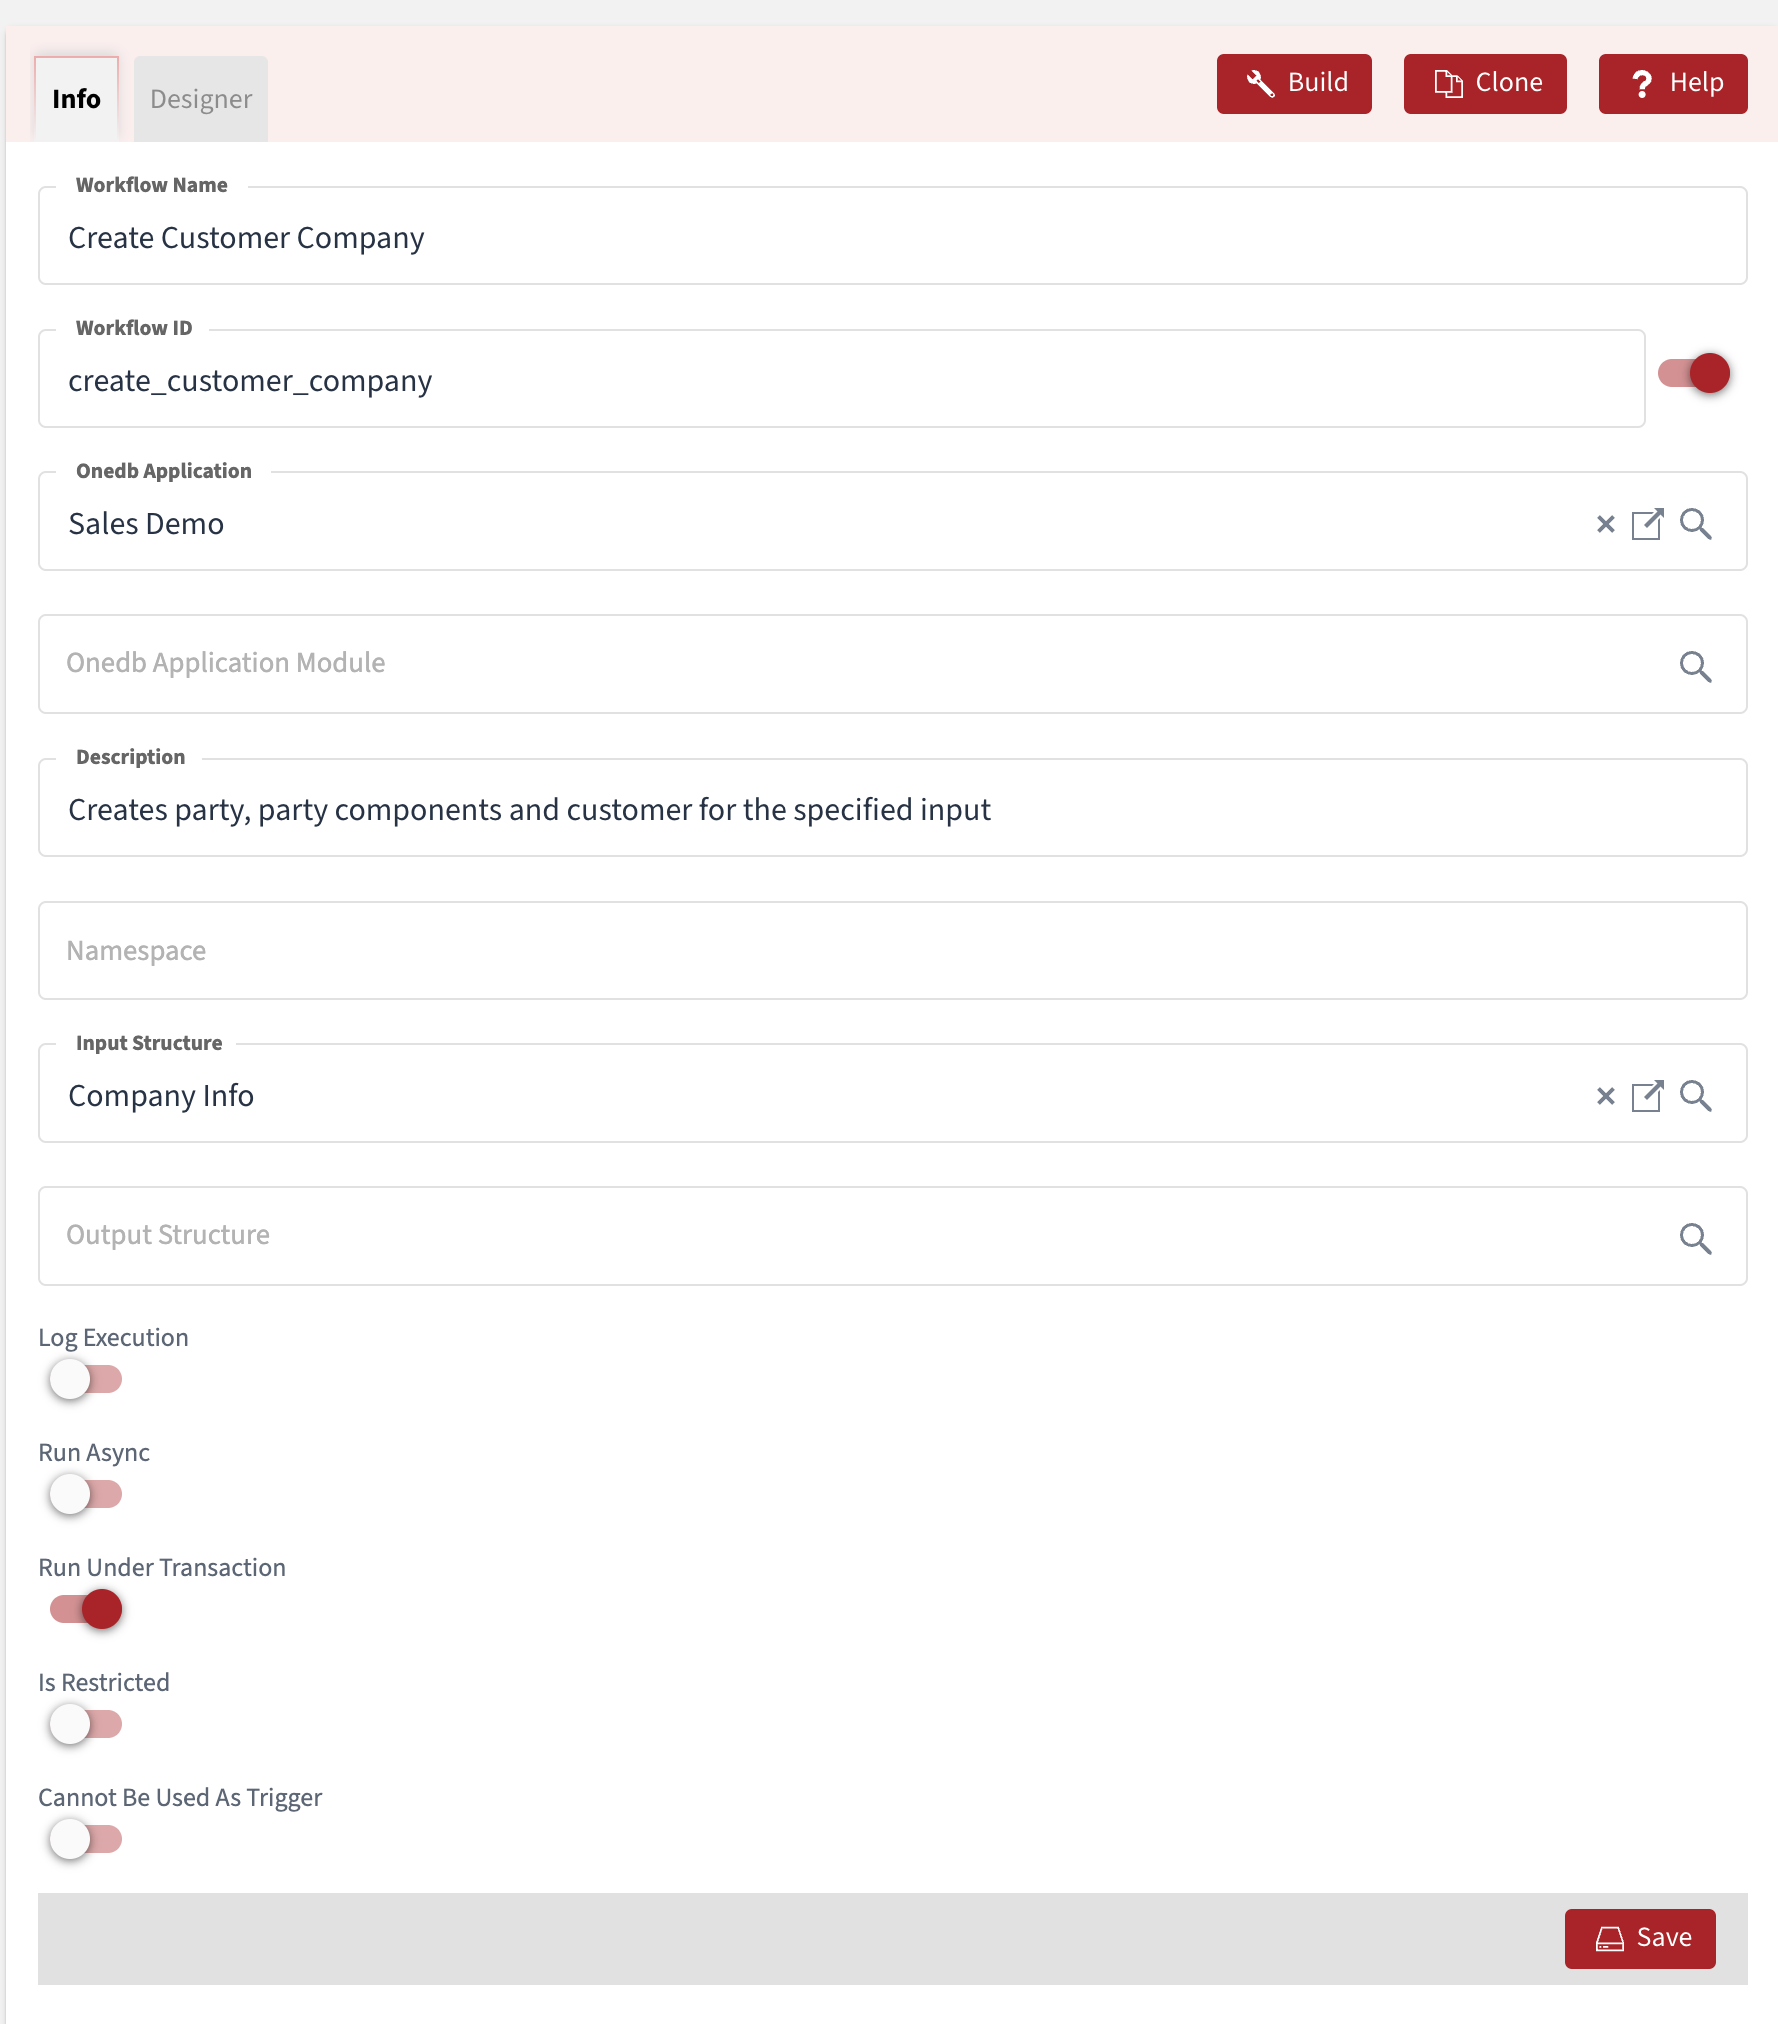
The next step is to create the workflow by navigating to Home Screen -> Data Definition Layer -> Functions -> Workflows. As shown in the image below, the Input Structure is the one we just created. Since multiple records will be generated during the workflow execution, enable the Run Under Transaction flag to ensure an all-or-nothing behavior, maintaining data integrity.
The workflow will consist of several steps, each of the Save Record type. To add a workflow step, simply drag the step from the pane containing all available step types and drop it onto the canvas. To configure the step, click on it, and the step properties will appear on the right-hand side.
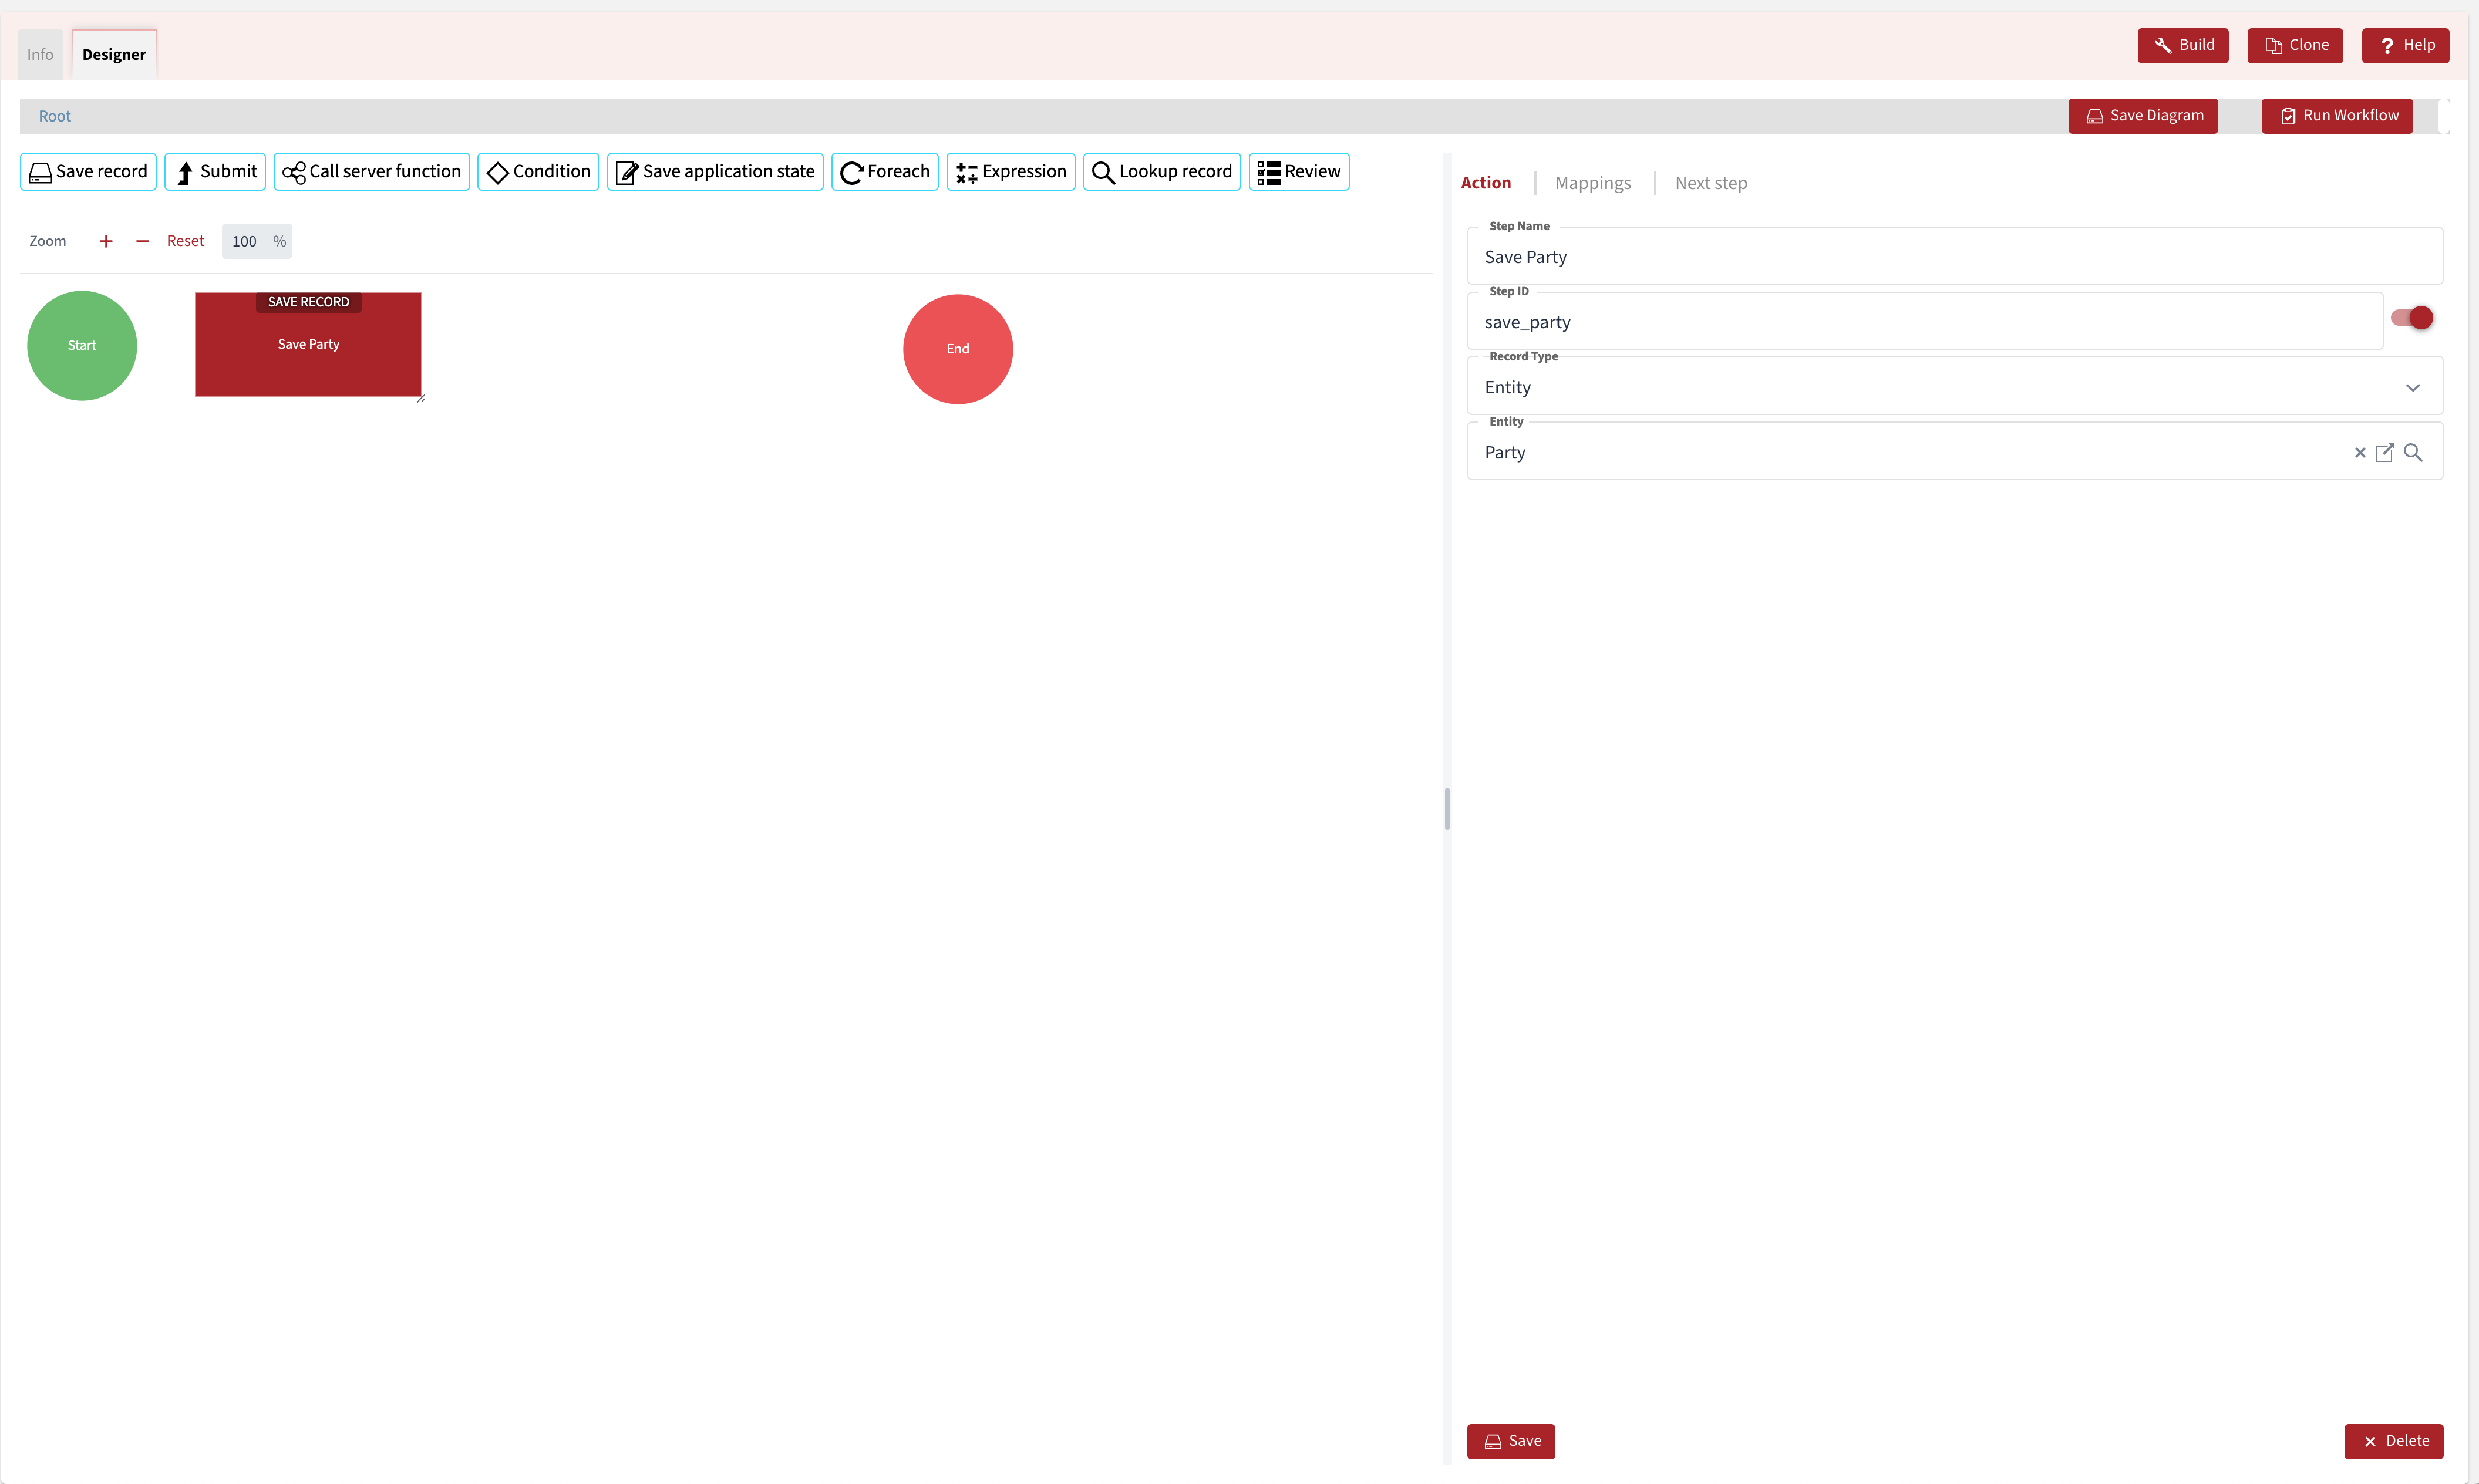
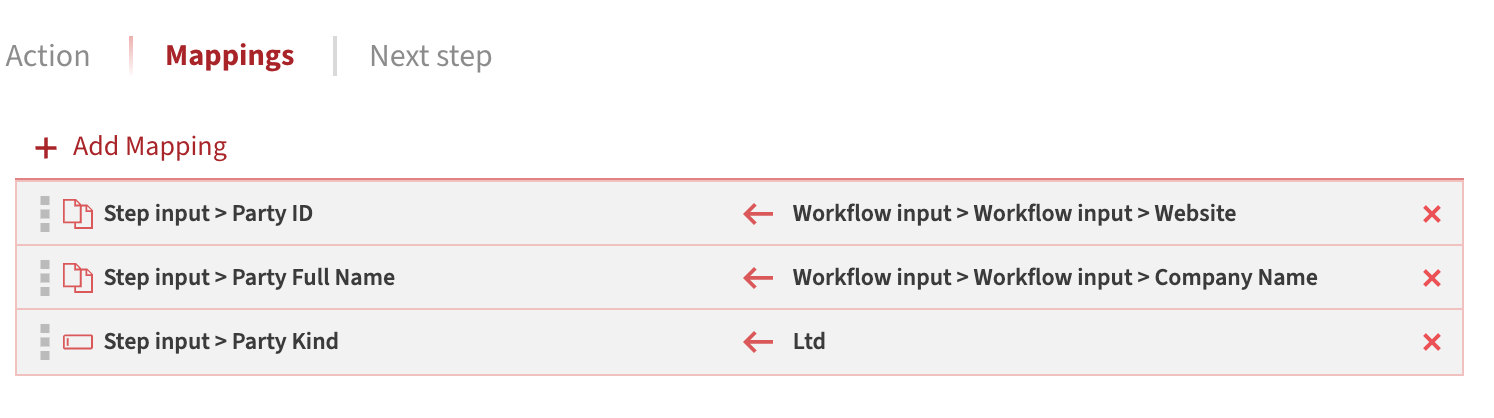
After Record Type and Entity/Component are set, click on Save. The next step is to configure the step mappings, which involves setting the input parameters for each step. Each mapping item has three elements:
- Target (workflow step parameter)
- Map Type (can be Fixed value or Map (in which case everything from the workflow context can be used as a source))
- Source (some fixed value or reference from the workflow, depending on the Map Type)
We have the following mappings for Save Party workflow step:
- Party ID = Workflow Input > Company Name (Map)
- Party Full Name = Workflow Input > Company Name (Map)
- Party Kind = Ltd (Fixed value)
Next, we need to add child records to the previously created party in order to populate Party -> Company Info, Party -> Party eMails, and Party -> Party Phones. Since these are component records, the Record Type should be set to Component, and the Entity should be set to Party. Depending on the workflow step, you will configure one of the three components mentioned above.
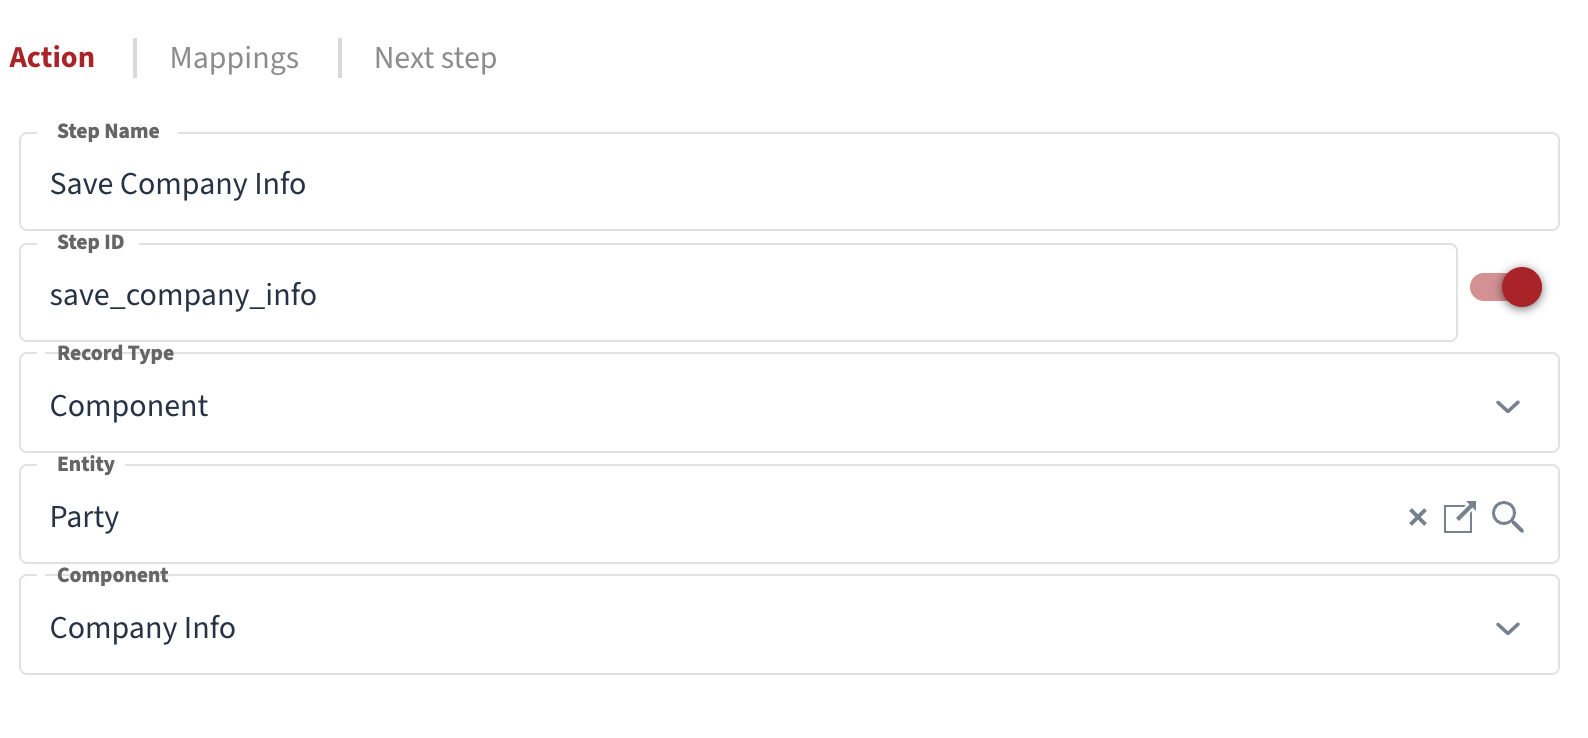
For component records, it’s important to establish their relationship with the parent entity in the Mappings section. The parent property is named Parent System ID and should be mapped to the System ID from the output of the Save Party step (Save Party > Data > System ID). For example, the Save Company Info step will have the following mappings:
- Parent system ID = Save Party > Data > System ID (Map)
- Registered Name = Workflow Input > Company Name
Like this one, we will add two more steps — Save Email and Save Phone.
Save Email mappings:
- Parent system id = Save Party > Data > System ID (Map)
- Rank = 1 (Fixed value)
- Type = Primary (Fixed value)
- eMail Address = Workflow Input > Email Address (Map)
Save Phone mappings:
- Parent system id = Save Party > Data > System ID (Map)
- Rank = 1 (Fixed value)
- Type = Work (Fixed value)
- Phone Number = Workflow Input > Phone Number (Map)
The final workflow step should create a Customer record, where the Party is referenced through the Customer Party field, rather than being a parent, as shown in the image below (image shows Customer entity to illustrate the relation between Customer and Party).
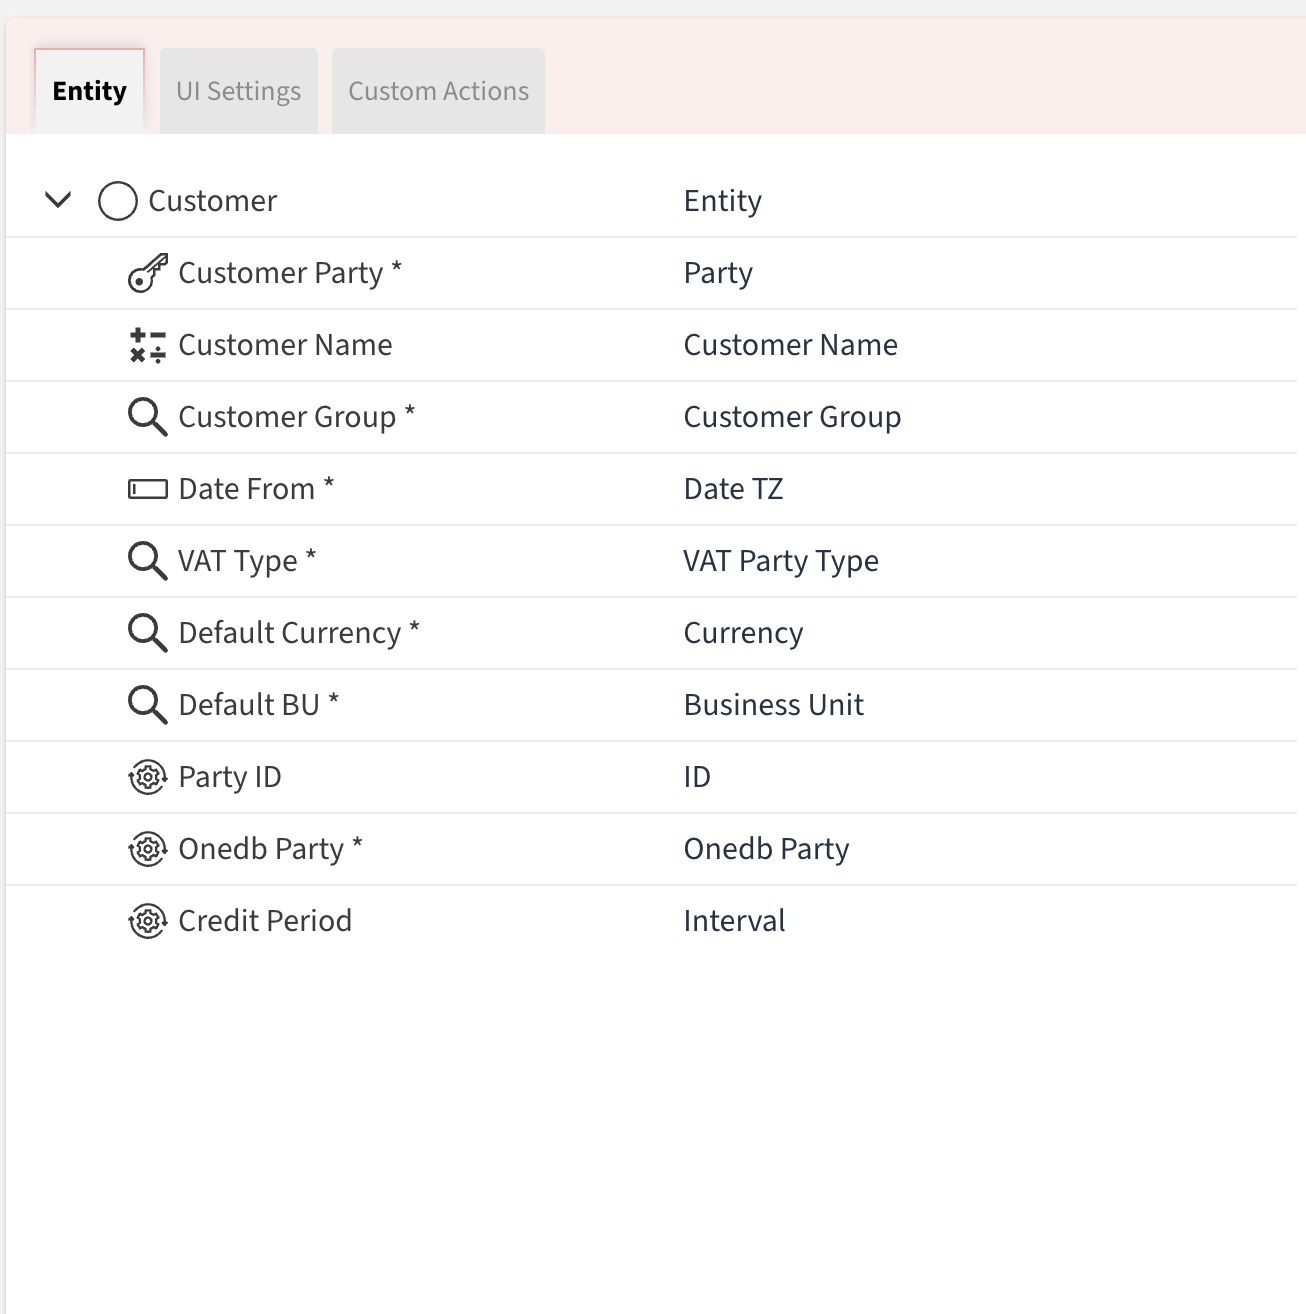
So, the Record Type here is Entity, while Entity is Customer.
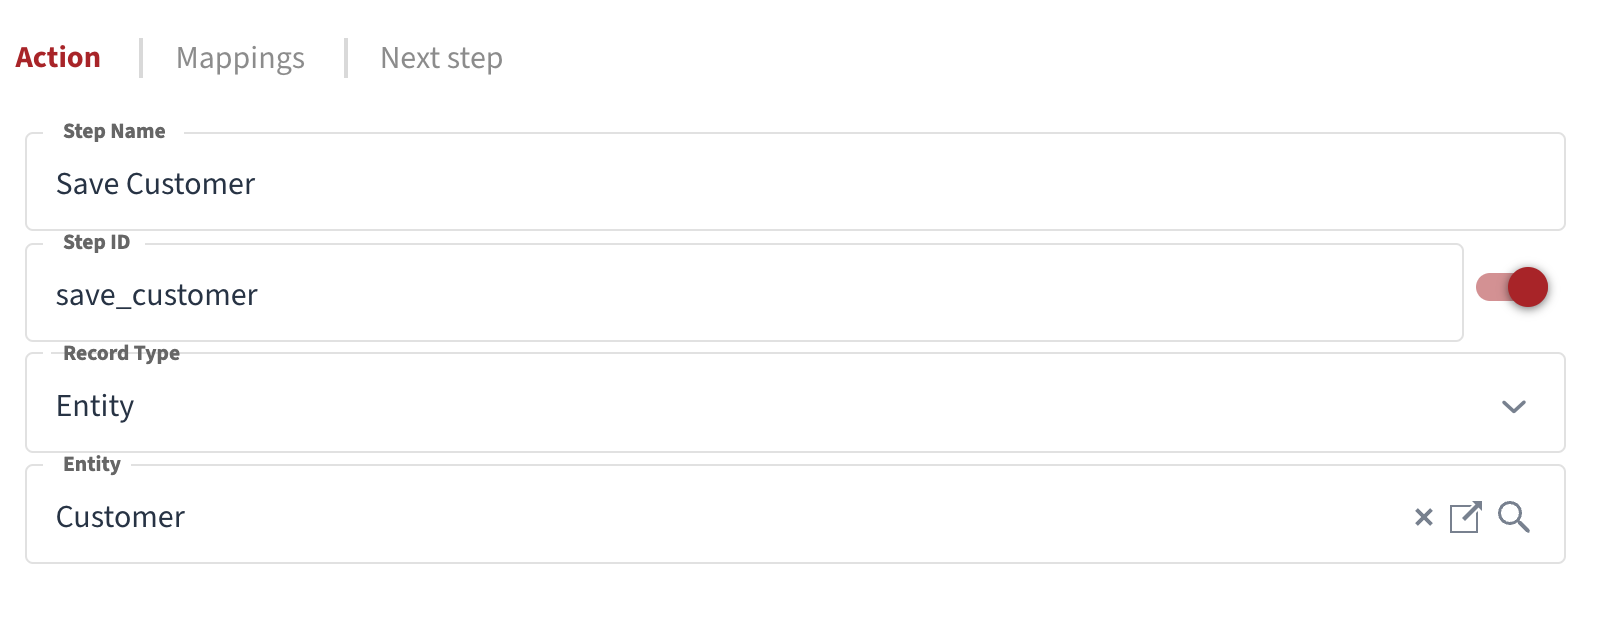
Save Customer mappings:
- Customer Party = Save Party > Data > System ID (Map)
- Customer Group = Eu Std Retail (Fixed value)
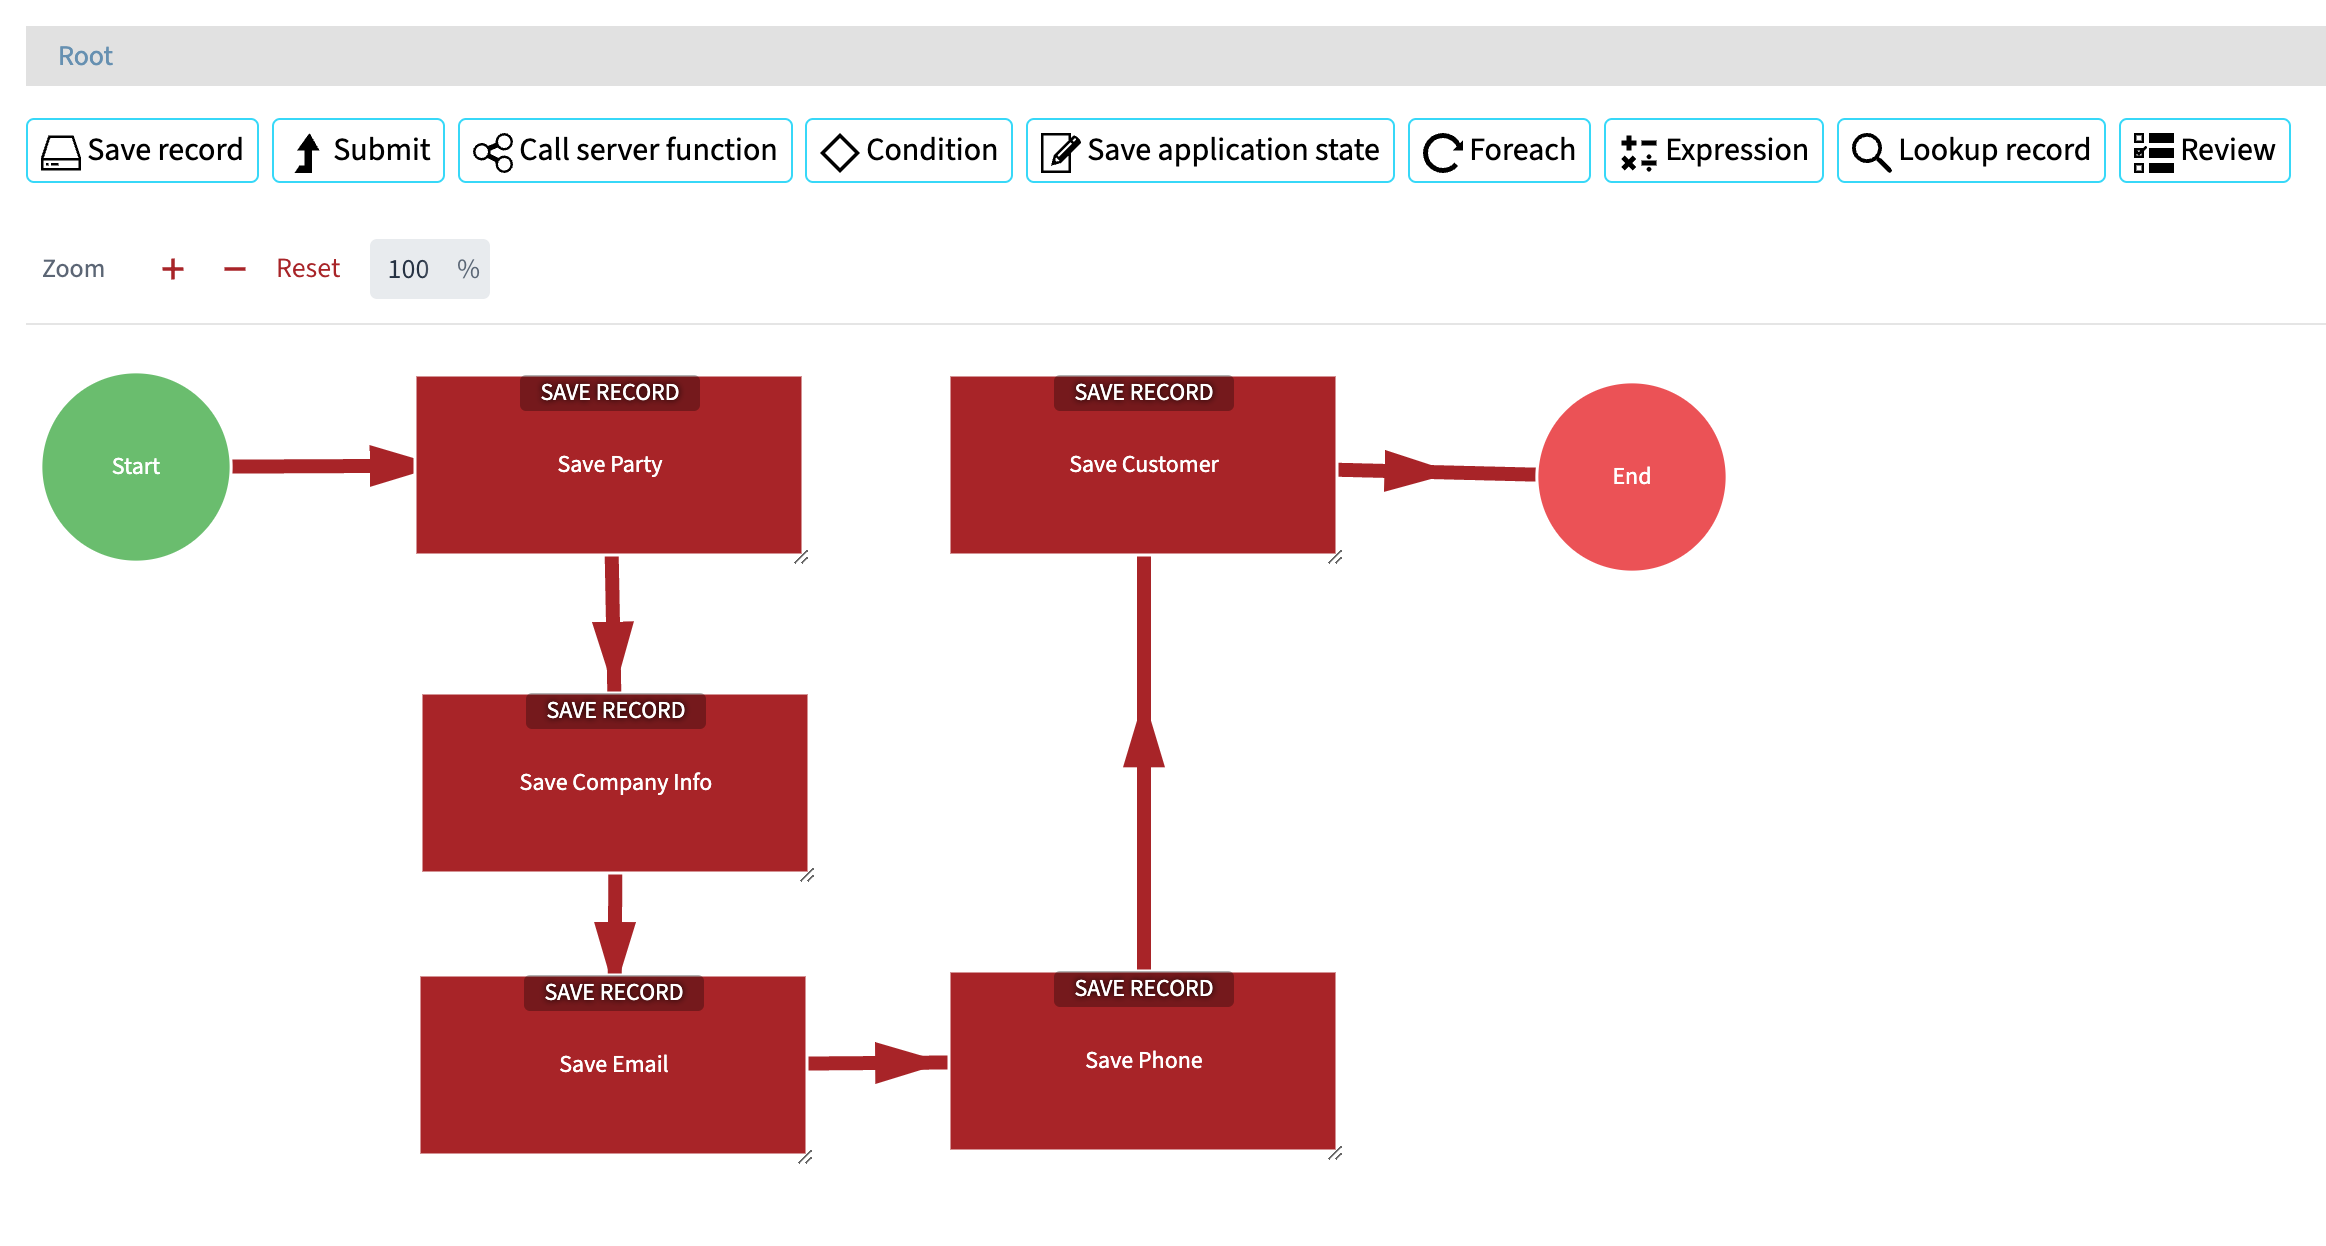
Once everything is set up, the diagram will display the disconnected workflow steps.
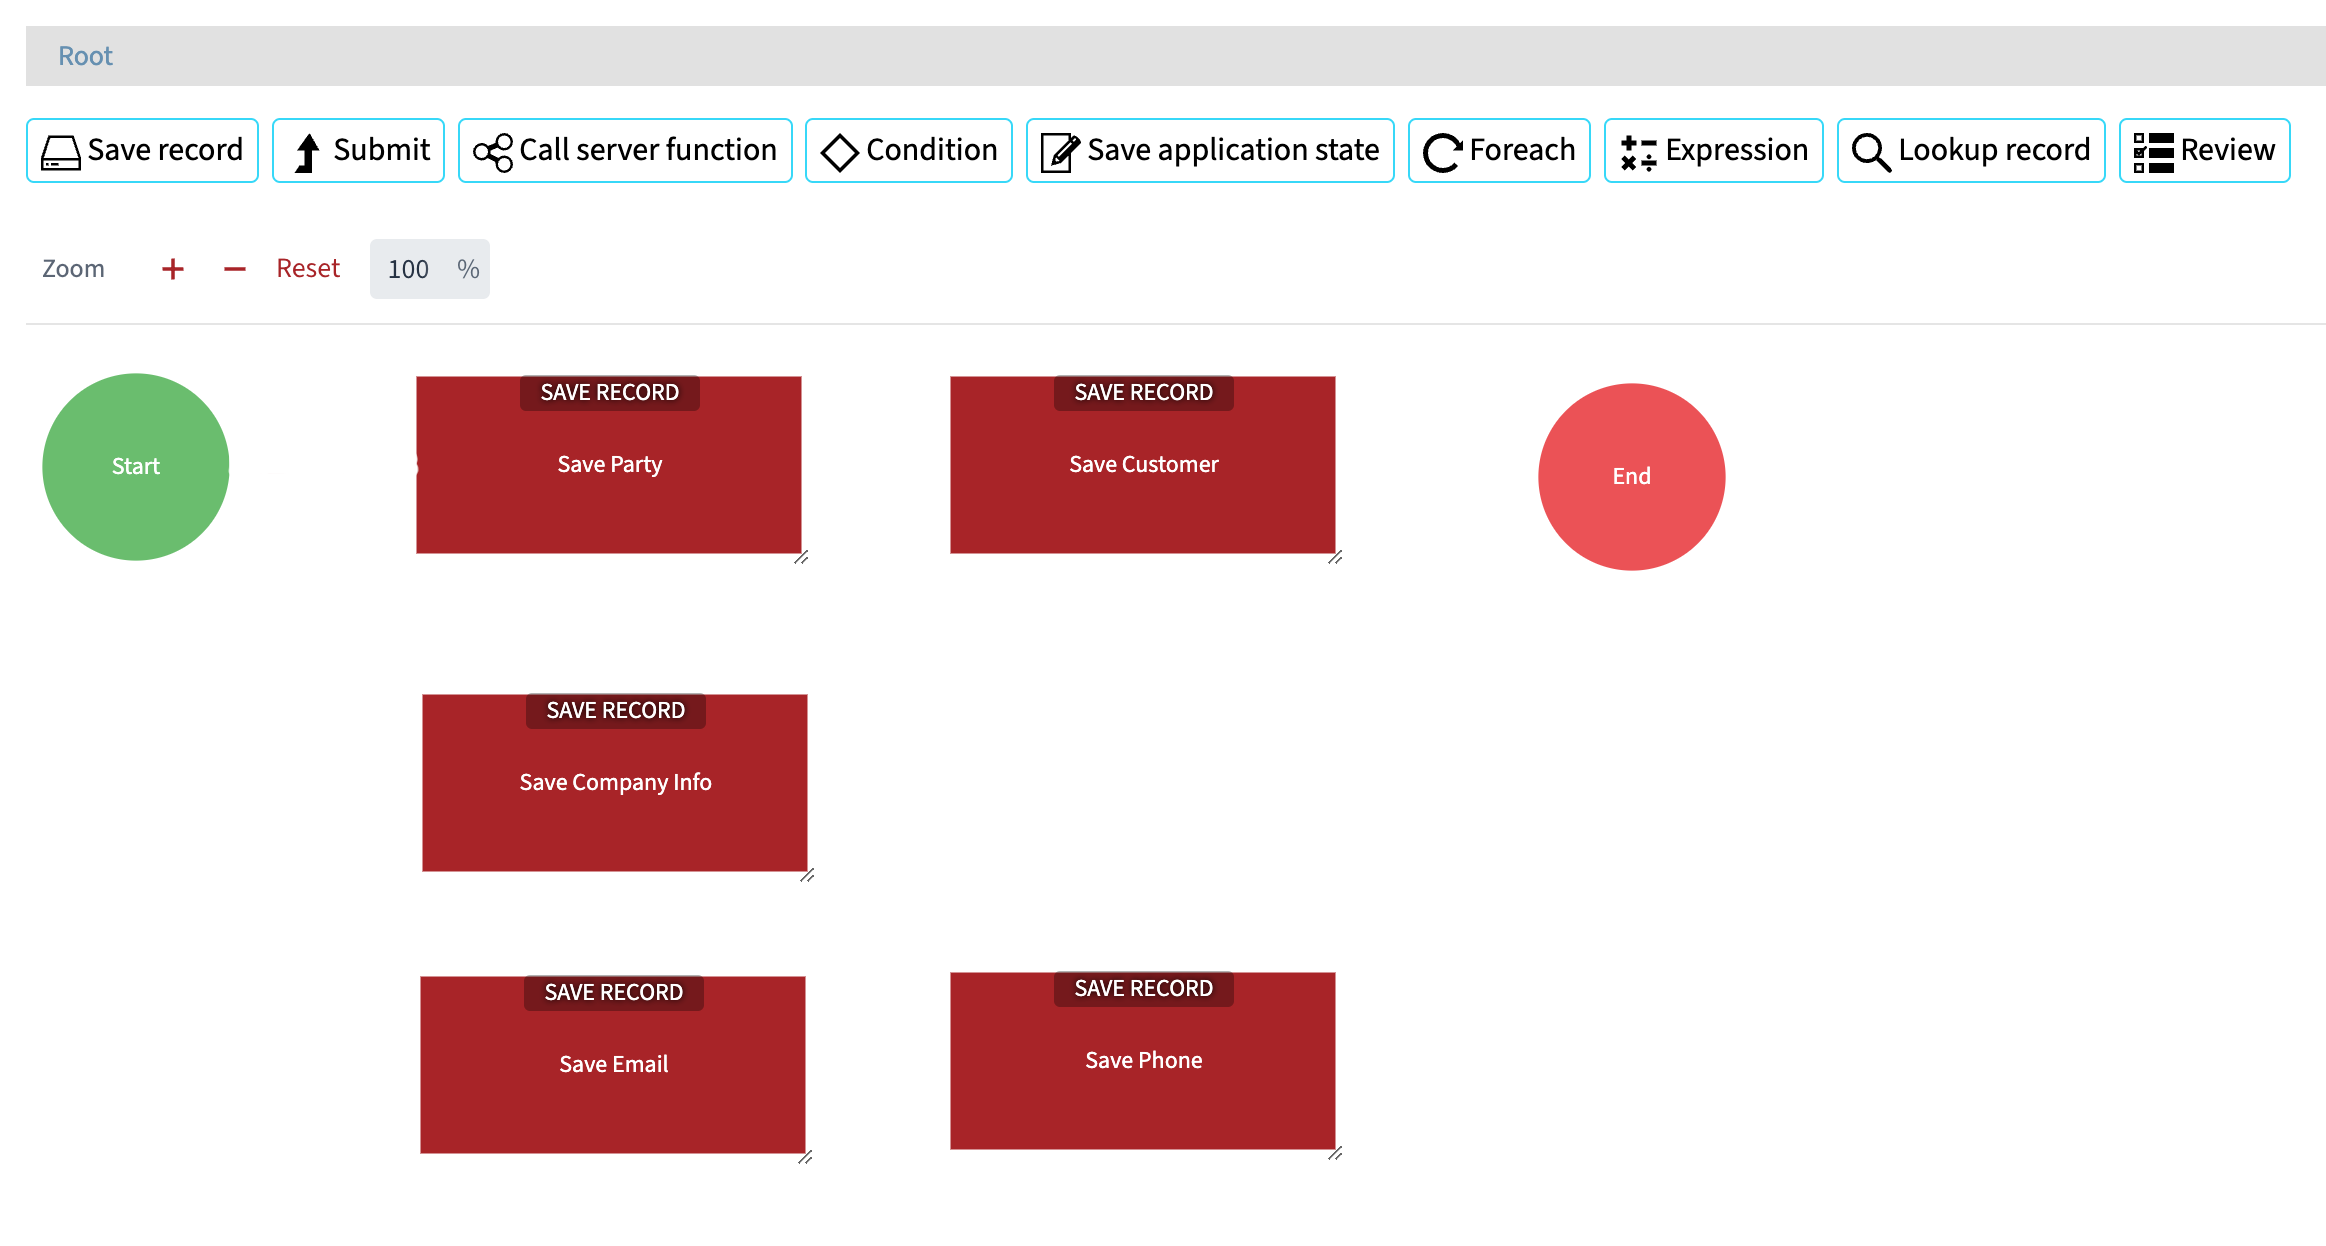
Now, we will connect the steps into a sequence. To configure the first step, click on Start, select a step from the list, and save your settings. For each subsequent step, click on the step and specify the next one in the Next Step tab.
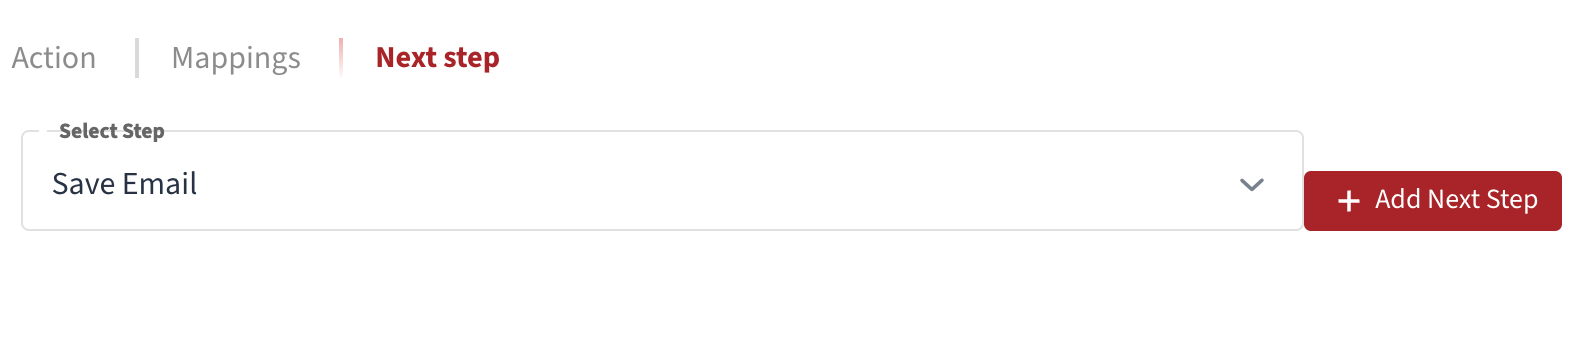
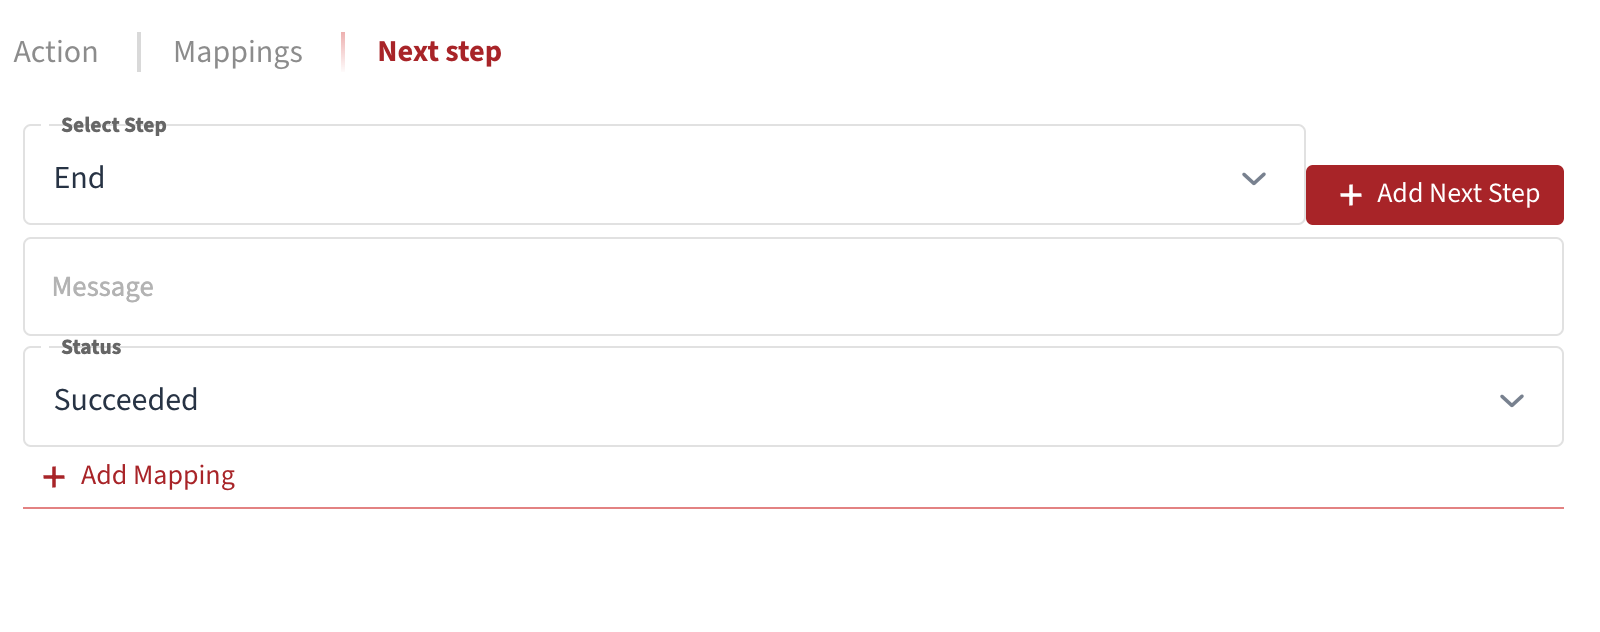
As a special case, when configuring the next step for the final workflow step, select End and set the status to Succeeded.
After configuring the next steps for each workflow step, the diagram will display a connected graph, as shown in the image below.
Click the Build button in the top-right corner to create a database function that implements the logic defined in the workflow.
To test the workflow, navigate to Run Function (Home Screen -> Run Function) and select the Create Customer Company workflow. The testing page will display input fields on the left and output on the right. Enter the Company Name, Email Address, and Phone Number, then click the Execute Function button.
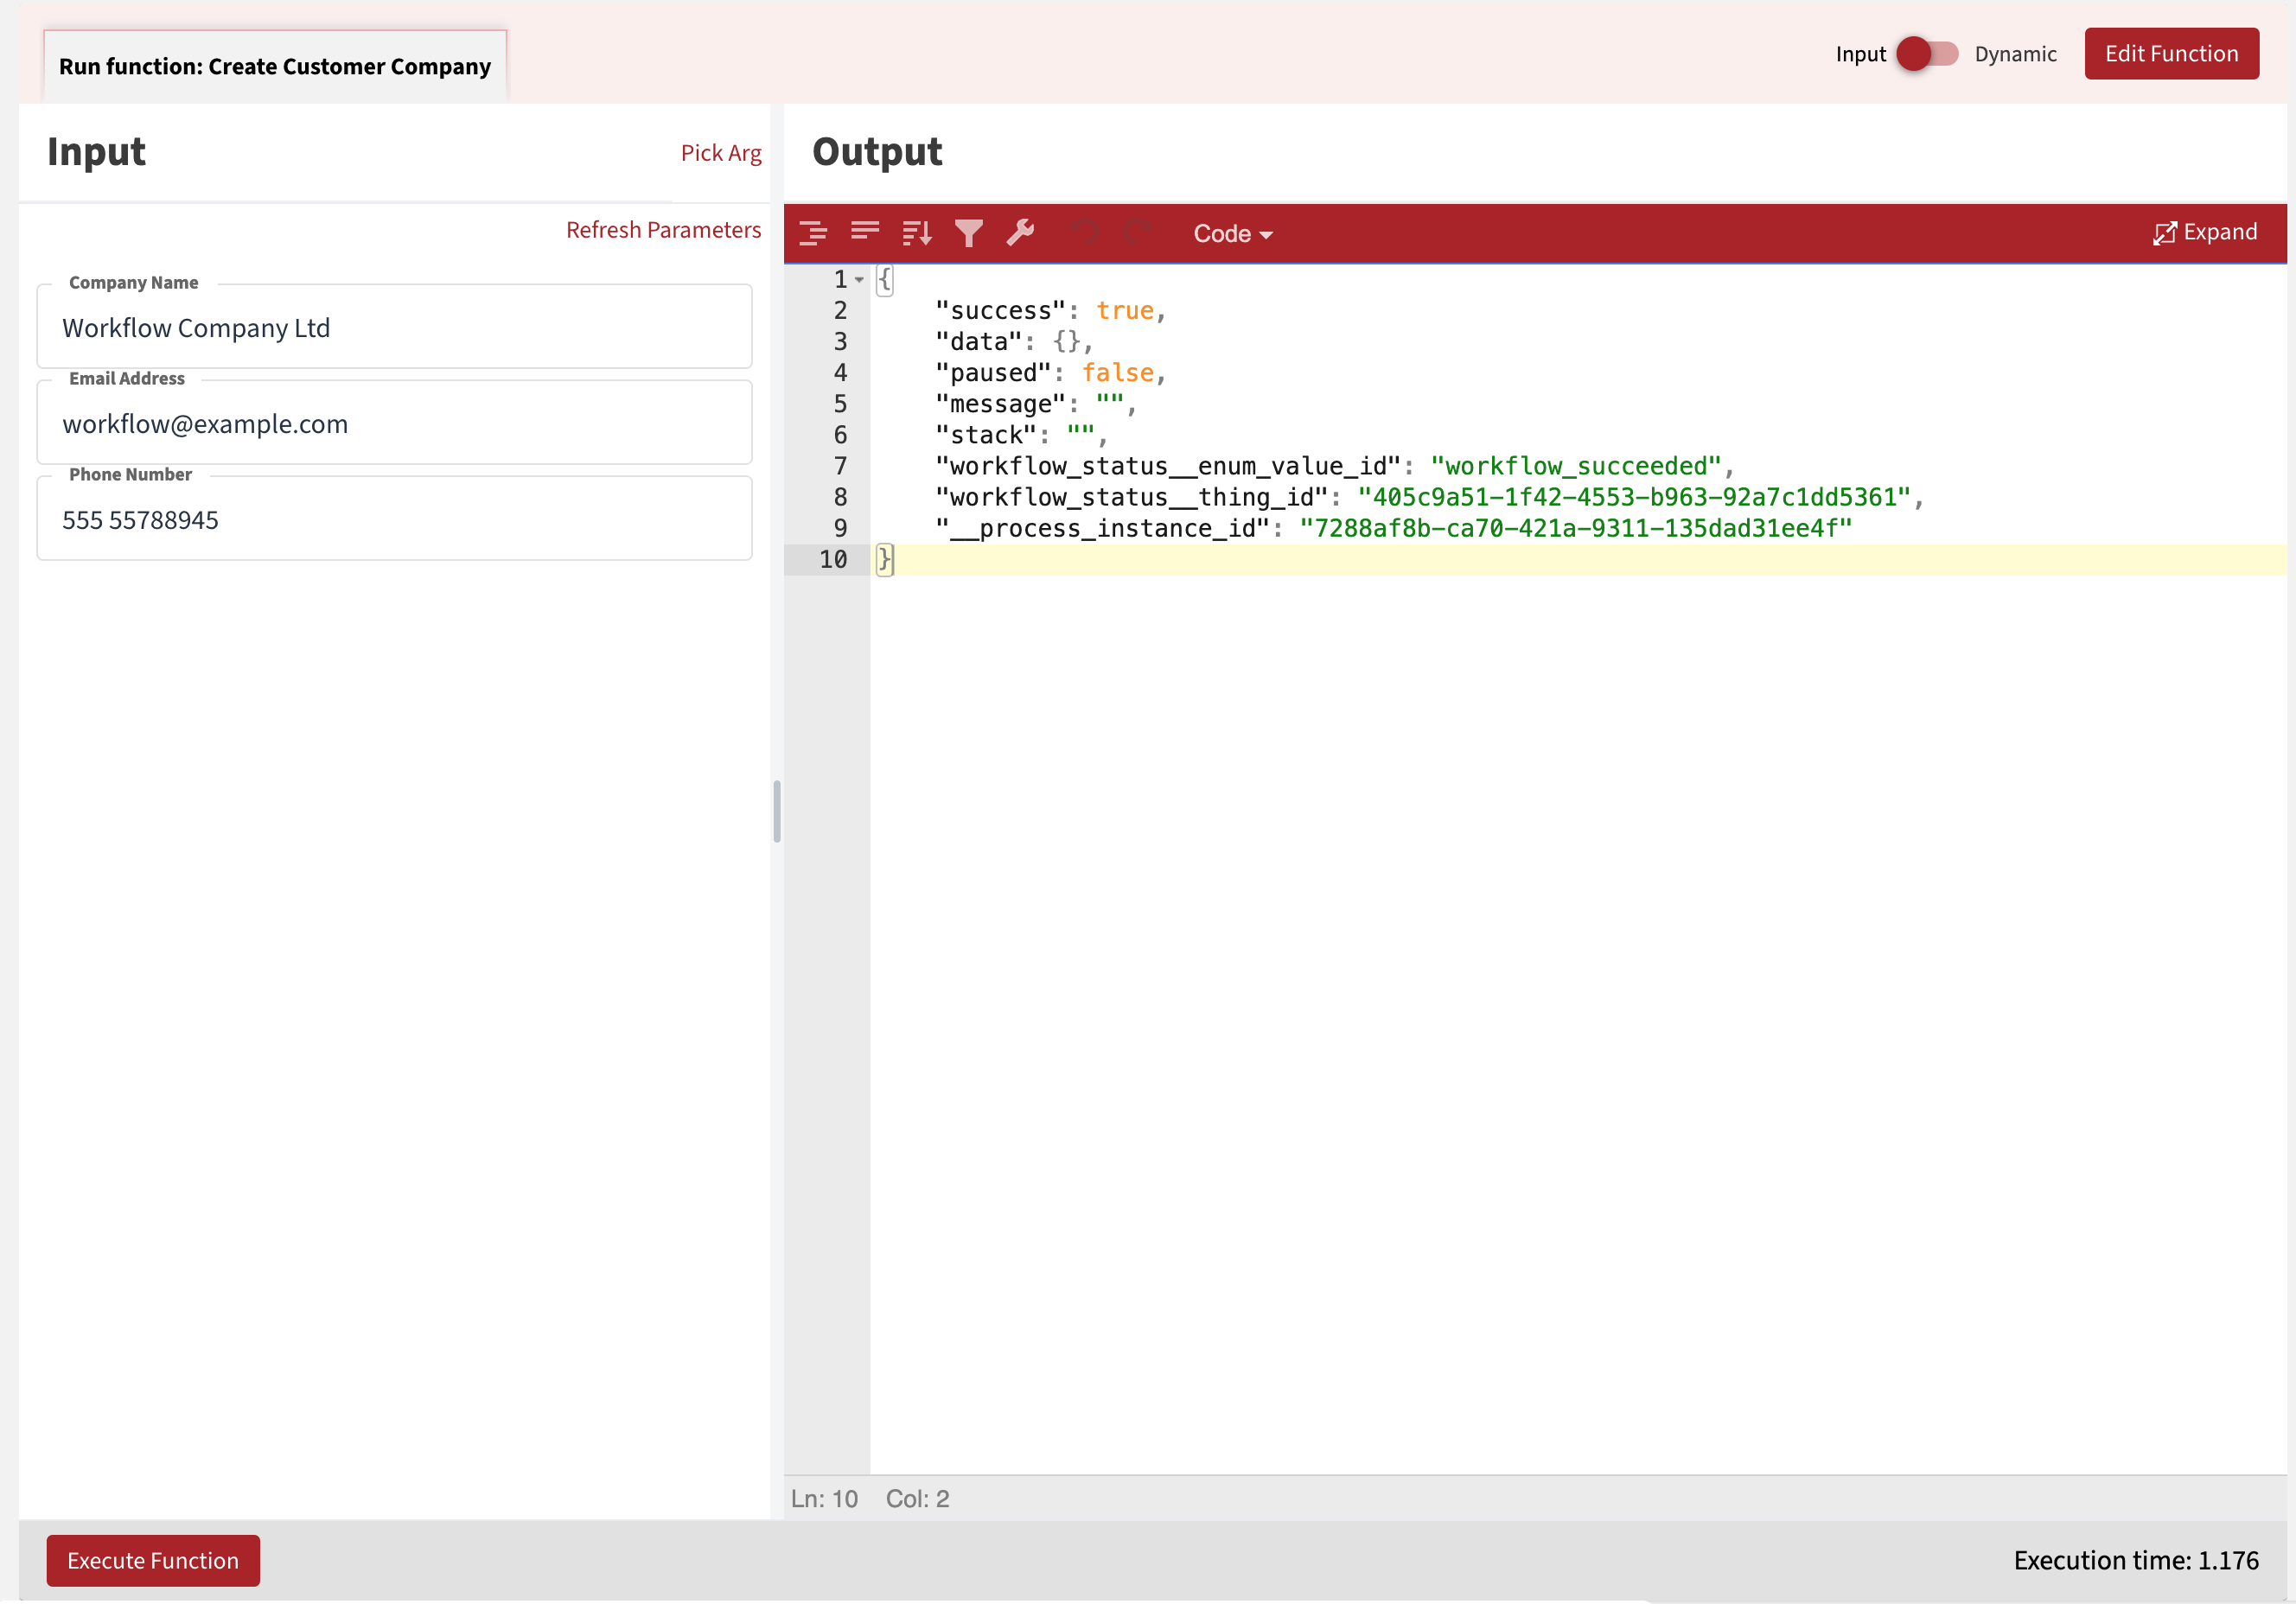
If everything works as expected, a customer and the corresponding party records will be created.